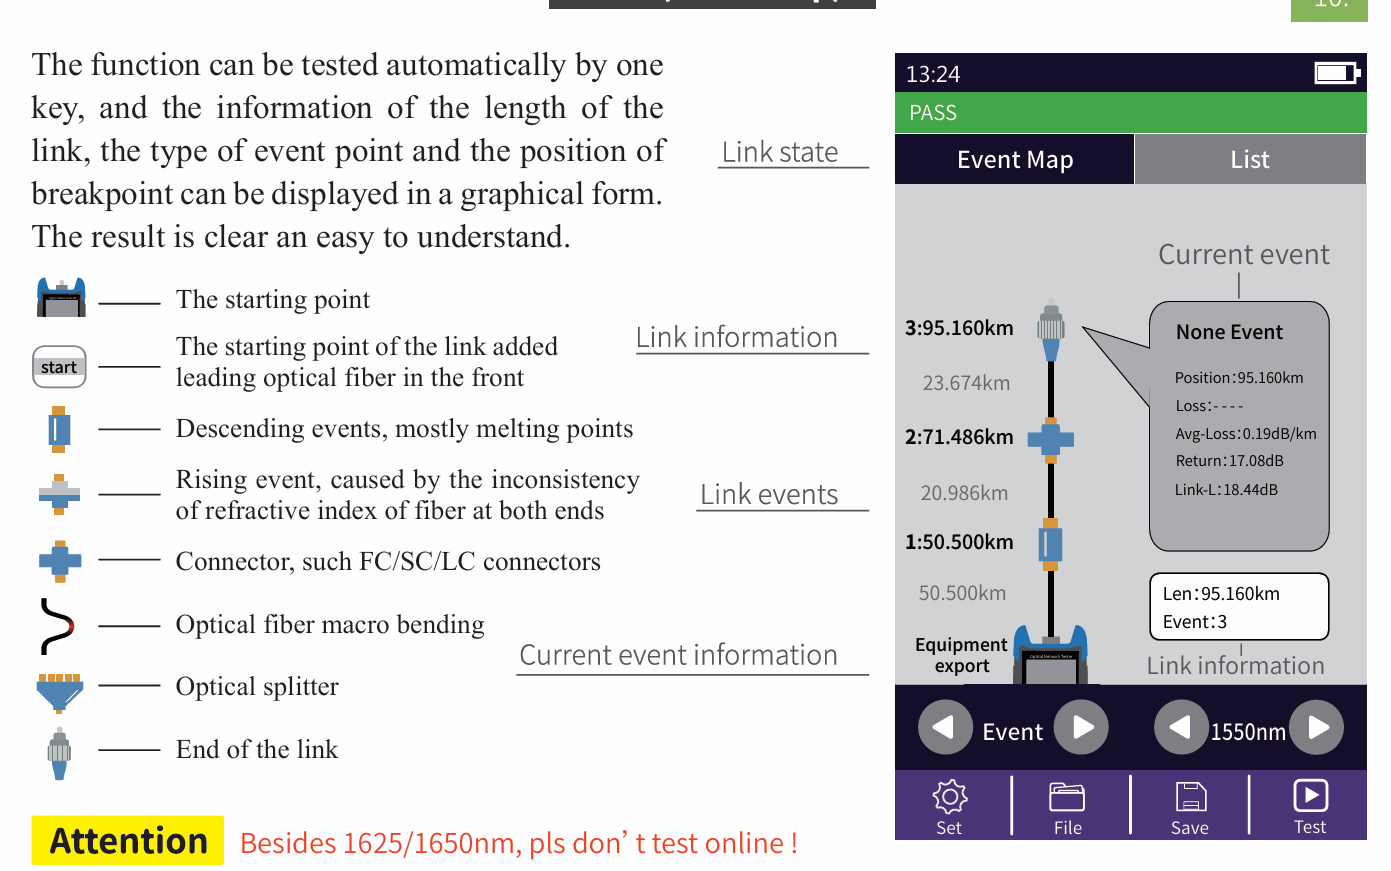
Attention
Besides 1625/1650nm, pls don’t test online!
OTDR-Setting menu
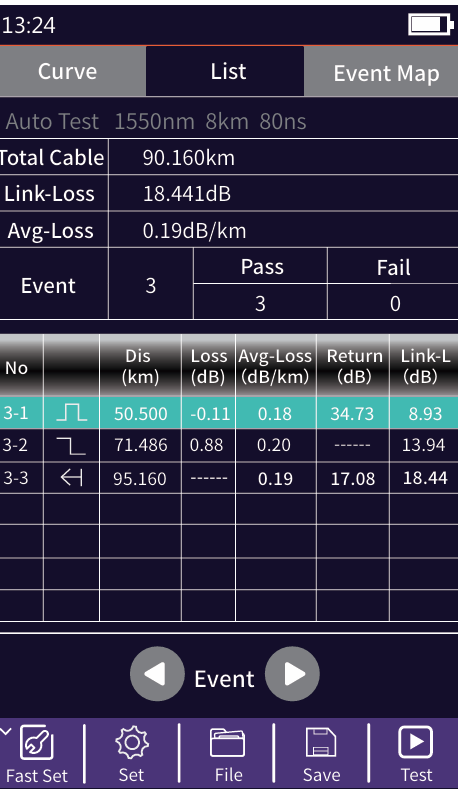
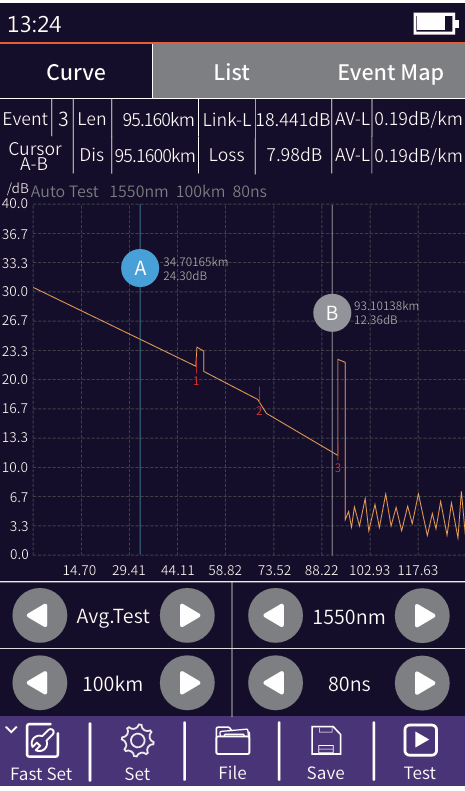
List: the test results are displayed in the form of a list.
Cable length: the total length of the link
Link-Loss: the total loss of the link
Avg-Loss: the average loss of the link
Event: the total number of events, passed numbers, failed numbers
In the event list:
NO.: the order of the current event
Type: the type of the current event
Dis: the distance of the current event
Loss: the loss value of the current event
Avg-Loss: the average loss value from the start to the current event
RL: the return loss value of the current event point
Link-L: the total loss from the start to the current event point
Expert OTDR
Expert OTDR: set parameters such as wavelength, range and pulse width.
FastSet: quickly set the test parameters of OTDR
Measurement mode: OTDR scanning event mode, AutoTest/RealTest/Avg.Test
Wavelength: select the test wavelength of OTDR
Test range: usually choose about 2 times of the length of the optical fiber to be tested
Test pulse width: 3ns ~ 20000ns optional, different range, the optional pulse width is different
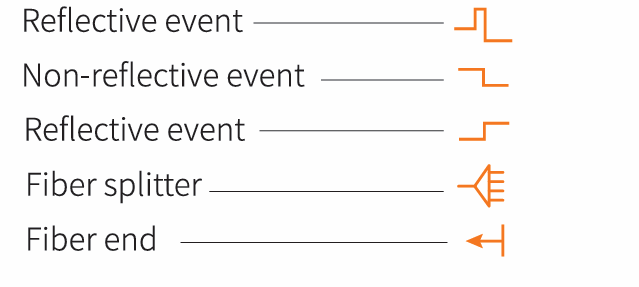
There are five types of events:
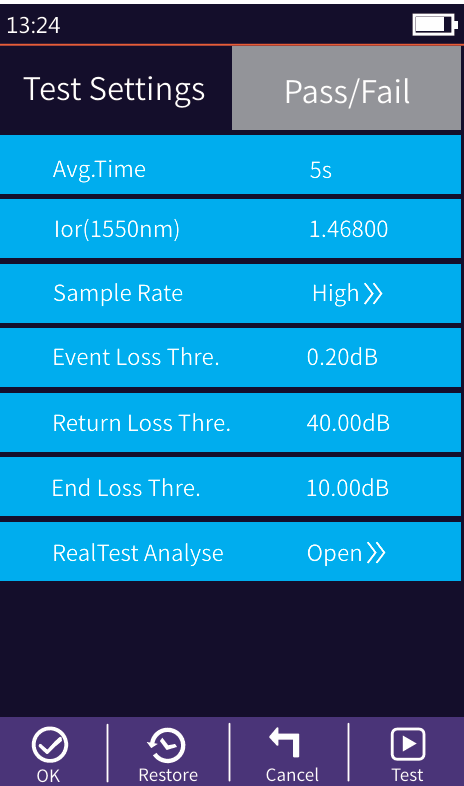
OTDR Setting
Set: Avg.Time and IOR are the same as those in Auto OTDR.
Sample Rate: Standard: test with standard accuracy
High: test in high precision mode, the test
time will be extended
Event Loss Thre.: set the loss threshold of connection point,
fusion point in the link that can be tested, between 0.2dB ~
30dB, and the default value is 0.2dB. Loss value larger than
the setting value will be listed in the event list, or it will be
ignored.
Return Loss Thre.: set the return loss threshold of the link
reflection events that can be tested, ranging from 10dB to
60dB, the default value is 40dB.
End Loss Thre.: set the loss threshold at the end of link that
can be tested, ranging from 1dB to 30dB, the default value is
10dB.
RealTest Analyse: turn on or off the automatic analysis
OK: save the set parameters
Restore: restore factory settings
Press the 【Save】 key to save file after test complete, pop up the keyboard, enter the name of the file, and press Enter to save the file. If the automatic save (otdr) function is turned on in "System Settings", it will be saved automatically after the test complete without manual operation.
Enter the system settings, open the auto-saving function, the instrument will automatically save the test files after the average or auto-test.
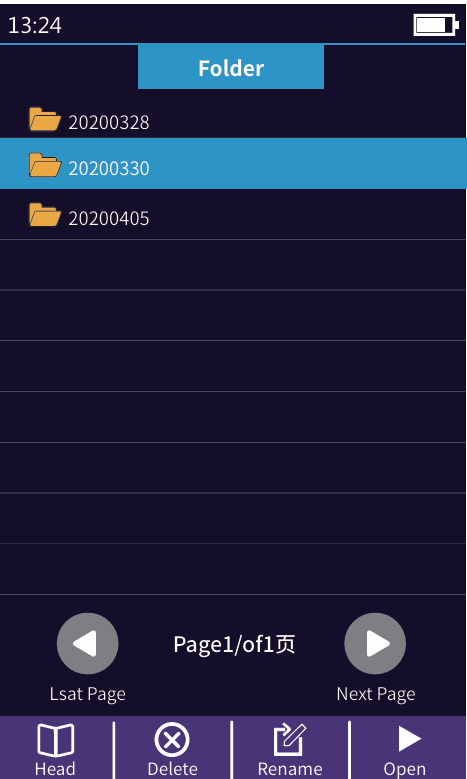
OTDR-File Operation
Press 【File】 to enter the file list.
Head: back to the first page
Delete: delete the current file or folder
Rename: change the name of the current file or folder
Open: open the selected file or folder
iLOM(Event Map)
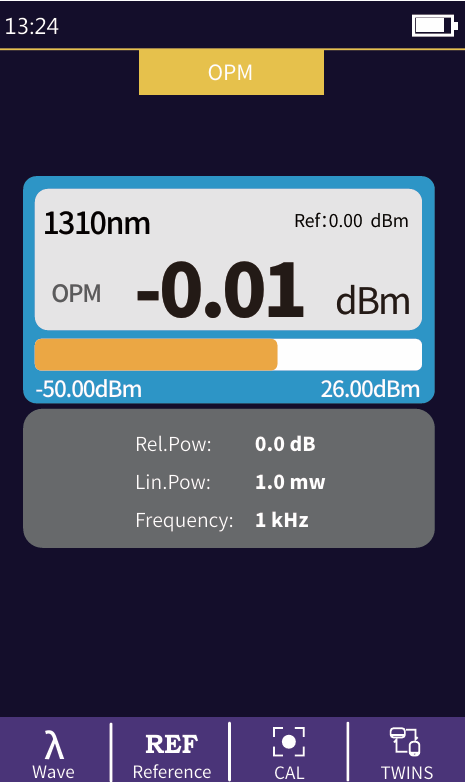
OPM
The function is used to test the power of optical signal
and insertion loss of various devices and optoelec
tronic components. It can identify and measure the
frequency of 270/330/1000/2000Hz optical signal.
Wave: switch the working wavelength
Reference: set current power as reference power
CAL: enter the user calibration mode and
calibrate with the standard light source
TWINS: identify the wavelength and frequency of the
tested laser source. This function is used with the twins
function of the local laser source-50~+26dBm: received power>-10dBm-70~+6dBm: received power>-30dBm
Absolute power, relative power and
linear power are converted as follows:
PAbs.=10lgPLin./1mW
PRel.=P Abs.-PRef.
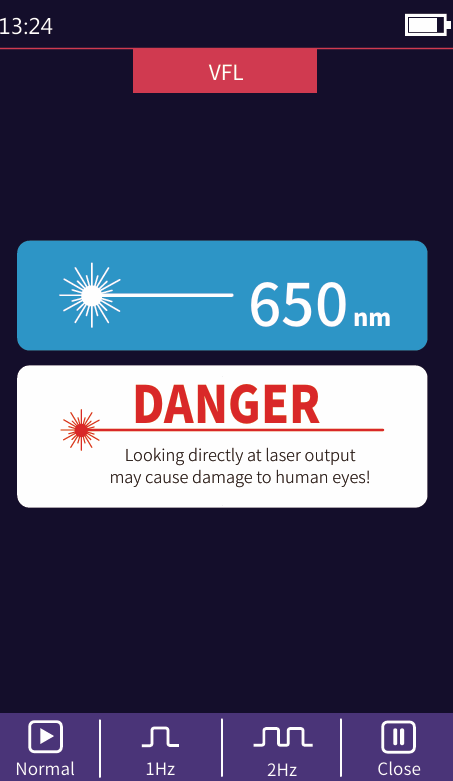
VFL
Visible red light (650 nm) is injected into the
optical fiber, and the position of the optical
fiber fault point can be judged conveniently
and accurately by observing the leakage
position on the measured fiber. It is suitable
for the detection of bare optical fibers,
jumpers and other high loss sections caused
by near-end faults and micro-bending of
optical fibers and cables which can leak red lights.
Normal: turn on red light, continuous light
1Hz: red light source flashes once in 1 second
2Hz: red light source flashes twice in 1 second
Close: turning off red light
Warning
Looking directly at laser output may cause damage to human eyes!
Laser Source
The wavelength of stabilized laser source is
the same as OTDR wavelength. It is used to
measure the parameters of telecommunica-
tion, CATV, LAN cable, insertion loss, isola-
tion loss and echo loss of optical passive
devices, and wavelength responsiveness of
detectors.
Open: turn on the laser source
Wave: switch the wavelength, the output
wavelength is consistent with OTDR
Mode: switch the modulation frequency of
light source, CW/270/330/1000/2000Hz
TWINS: enter the paired output mode. This
function is used with the twins function of
the local optical power meter
Warning
Looking directly at laser output may cause damage to human eyes!
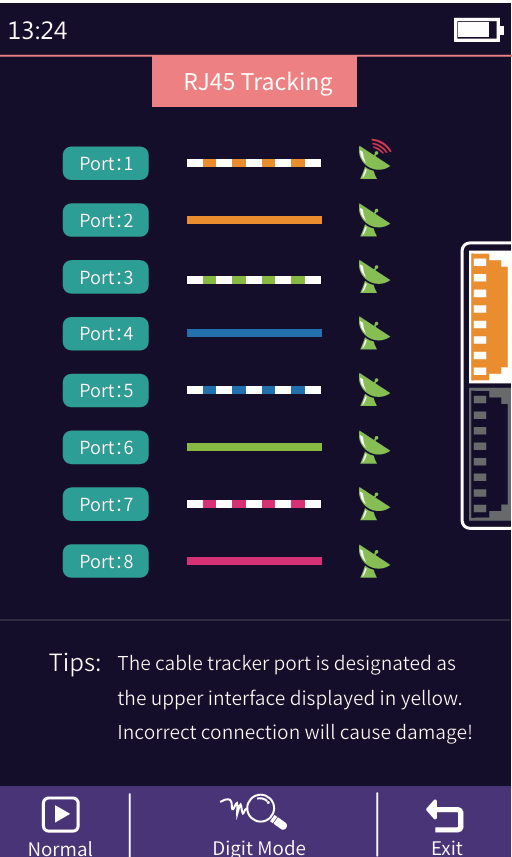
RJ45 Tracking
Rj45 Line Tracker
Used for Rj45 cable length testing and wire tracker. After the
line-finding function is activated, the cable being searched is touched
by the distal end of the line-searching, and the sound of continuous
“drops and drops” heard.
The equipment can withstand voltage and
prevent burning, and can be directly charged
for line finding. Ethernet switch, router and
other weak current equipment with DC
voltage less than 60V.
Normal: open the RJ45 cable tracking function
Analog Mode/Digital Mode: different route
tracking methods
Standard : Digital cable tracker
Attention
The cable tracker port is designated as the upper interface displayed in yellow. Incorrect connection will cause damage!
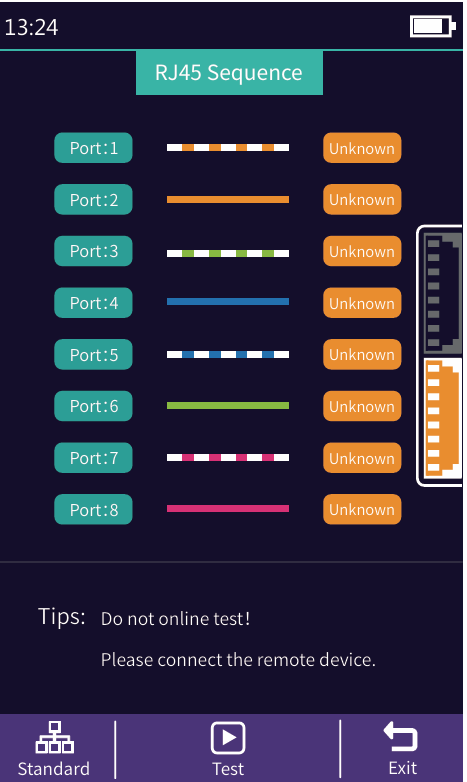
RJ45 Sequence
R
J45 line sequence measurement.
Measure the sequence of 8-core wires inside the network cable. Please connect to the remote module when measuring.Standard: select different network cable standards
Test: start cable sequence test
Exit: exit the cable sequence test and return to the main interface
Warning
Please do not test online!
Attention
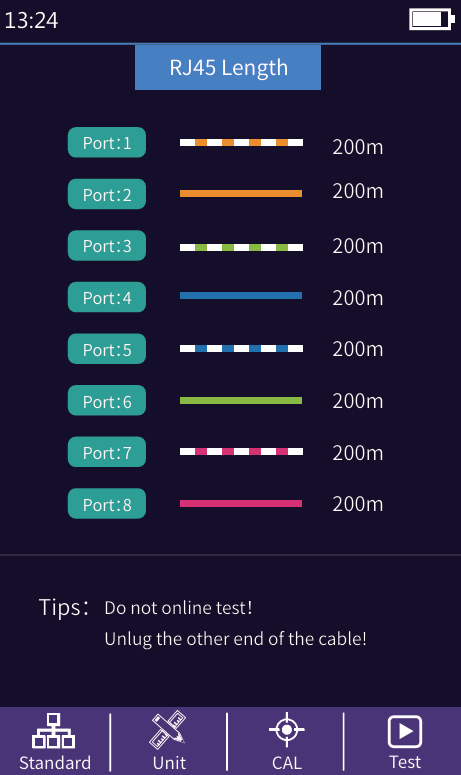
The cable length port is designated as the lower interface displayed in yellow. Incorrect connection will cause damage!
RJ45 Length
RJ45 Length test:Test the length of the
network cable.
Standard: select different cable standards
Unit: switch different units
CAL: adjust the test result according to the
actual length, and display length = last test
result × correction
Test: start cable length test
Warning
Please do not test online!
Attention
The cable length port is designated as the lower interface displayed in yellow. Incorrect connection will cause damage!
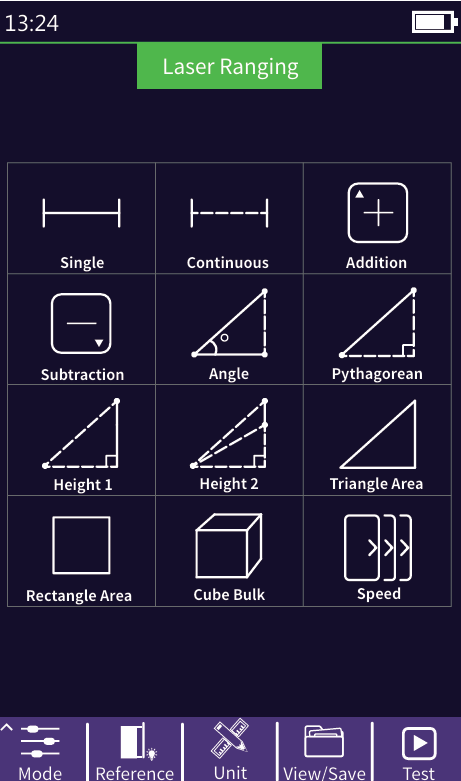
Laser Ranging
Laser Range: the maximum test distance is 40 meters
Mode:single/Continuous/Additio/Subtraction/An
gle/Pythagorean/Height1/Height2/Triangle
area/Rectangular area/Volume/Speed measurement
The solid line in the measurement mode icon is the
parameter to be tested
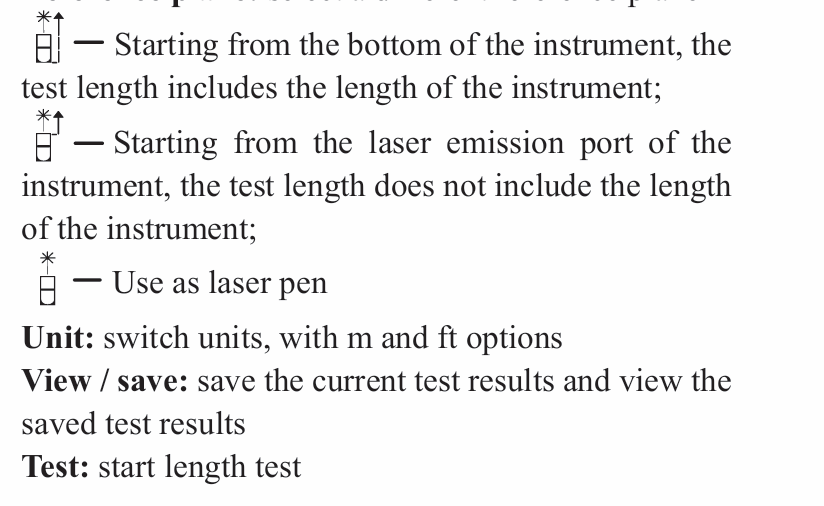
Reference plane: select a different reference plane
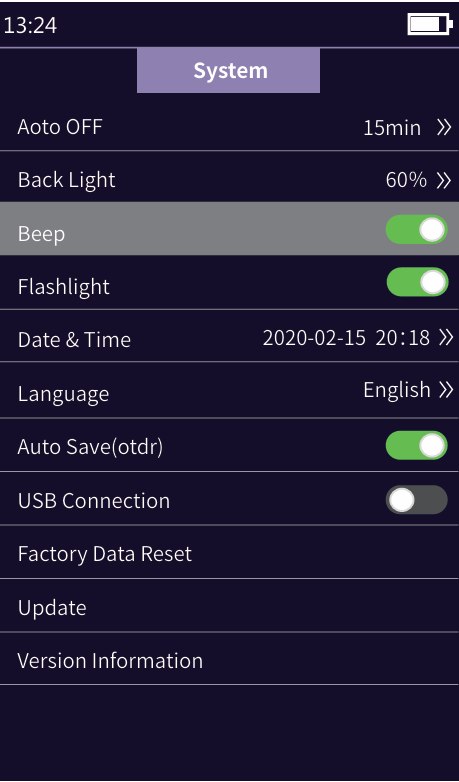
System settings
Auto OFF: Set auto shutdown time
Backlight brightness: Setting backlight brightness
Sound: turn the touch tone on or off
Flashlight: turn the flashlight on or off
Date & Time: set the instrument time and date
Language: displays the native language type
Auto Save: automatically save the curve file after
opening
USB connection: connect to the computer after
opening and transfer data
Restore factory settings: restore default parameter
values
Upgrade: software upgrade
Version information: view local information and
alarm records